Winterizing Kit Instructions
(Produced by Laura Maigatter, Head of Beekeeping Operations)
Provides three areas of protection:
- Mouse guards
- wire for the entrances
- steel wool for the lip along the lid
- Interior pillowcase desiccant
- Beerito windblock
You will need:
- staple gun
- phillips screwdriver
- garden/leather gloves
- 4mm allen tool
- protective veil and gloves (optional)
STEP ONE: Mouse Guards
- Four wire trapezoids, one for each of the four entrances.
- Wire mesh for the doors that allows bees to pass through, but is too small for mice.
- Remove in spring
Instructions:
- The wire should be stapled inside the hive, not outside. This is to prevent unsightly marks on the outside when the guards are removed in spring for better bee access.
- Place the first guard over the unused end entrance, inside the hive, with the shorter length facing down to match the line of the cradle. You may need to bend or cut the the ends slightly if they are too long.
- Use at least 4 staples to secure the guard, as shown.

Staples have been highlighted for you to see how Beepods Beekeepers have attached the mouse guards.
- Repeat the process on both of the side entrances, this time with the longer sides of the trapezoid facing down.
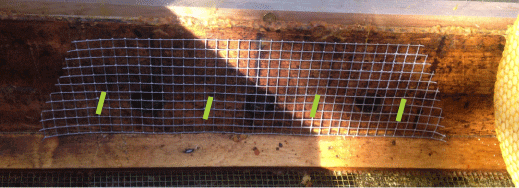
Beepods Beekeepers have highlighted staple placement between entrance holes and outside entrance holes.
- If you feel compelled to add more staples, we won’t judge. We consider 4 to be the minimum, keeping in mind that removing the staples in spring will cause wear on the hive over time. If you think there is enough give in the wire to allow a mouse to get in, by all means, staple away.
Front Door Mouse Guard Installation: Two Options
Option One:
- You may open the hive all the way to expose the inside of the front door to install the front door guard, as you did with the side and rear entrances.
Option Two:
- This seems more complex, but is vastly easier, I assure you. Essentially, you remove the front panel to allow immediate access to the front door, without having to disrupt the hive.
- Place a 5 gallon bucket (or something like it) under the Beepod behind the legs of the front door to slightly elevate the hive off its legs.

Beepod held up by a crate and a Beepod shutter

Beepod held up by a 5 gallon bucket so that the end panel can be removed.
- Use a small (4mm) allen tool to remove the six gold bolts attaching the front panel to the Beepod. Be sure not to remove the six bolts holding the legs onto the front panel. If you have a drill with a 4mm bit, please feel free to use that.
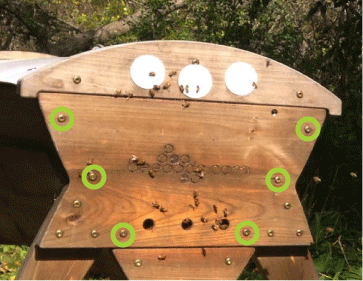
The correct 6 gold bolts are highlighted by green circles.
The correct 6 gold bolts are highlighted by green circles.[/caption]
- Use a hive tool or other tool to pop the front panel off the Beepod.
- Place the front panel (legs attached) on top of the Beepod and staple the remaining guard onto the entrance.
- Line up the front panel and reattach the gold bolts. Always hand screw them in part way, and then tighten with the small (4mm) allen tool after all six bolts are in place.
STEP TWO: Steel Wool/Mouse Defense
- Two long strips of steel wool.
- Prevents mice from chewing on the wood to gain access to the hive.
Instructions:
Line the lid of the Beepod with the steel wool.
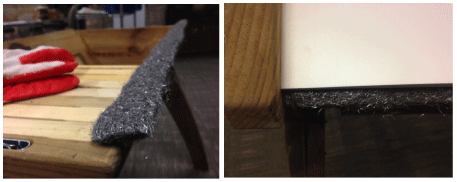
The steel wool will lay right on the edge of the Beepod cradle and stick out a little from the lid. Mice can’t chew through steel wool, unless they are mutants or New York Rats, maybe?
STEP THREE: Desiccant
- Pillowcase stuffed with wood shavings.
- Provides inner insulation, moisture control, and wind block, while still allowing air movement.
Instructions:
- Place the pillowcase over the top bars under the lid, with the shavings evenly distributed to start.
- Do not be concerned if it “waterfalls” over the edge of the top bars.

- You must adjust the shavings to allow room for the inside ribs of the lid to touch down.
- Distribute the shavings so that there is a taller lump on the middle measuring roughly 9 inches across. There should be smaller/shorter lumps on each side measuring roughly 4 inches.
- The indents left by adjusting the shavings in this manner should be flat to the top bars.
- Adjust the shavings until you can lock the lid. Some shavings may need to be removed, or placed in the part that is “waterfalling” over the edge.
STEP FOUR: Beerito Wrap
- Silver wrap for the hive.
- Vented wind block, with sun reflective properties.
Instructions:
Prep the Beepod for the wrap
- Remove the lid handle. Turn the lid over and, using your phillips screwdriver, begin to unscrew the two screws holding the handle in place.
- Be careful not to lose any of the screws or washers. To avoid losing them, I highly recommend flipping the lid back over while over the cradle of the Beepod, so any falling pieces will land in the Beepod cradle.
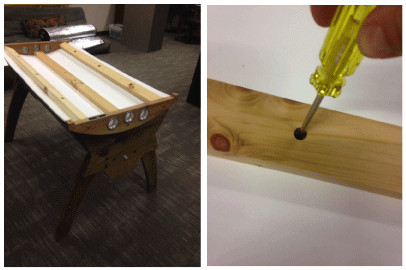
Flipping the lid on it’s back makes it easy to unscrew the hand-tighten only bolts from the handle. You can attach these again in the spring.
- Put the handle, screws, and any washers back together and store in the Beepod.
- Replace and lock the lid.
Adjust the legs.
- You will need to create enough space between the legs and the Beepod to fit the Beerito.
- Tug on the legs of the Beepod to pull them away from the body as much as possible.
Wrapping the Beepod
- Identify the outside of the Beerito. This is marked with a brightly colored sticker.
- Place the Beerito wrap under the Beepod, with the sticker face down.
- Line the mesh segment up with the vent on the bottom of the Beepod.
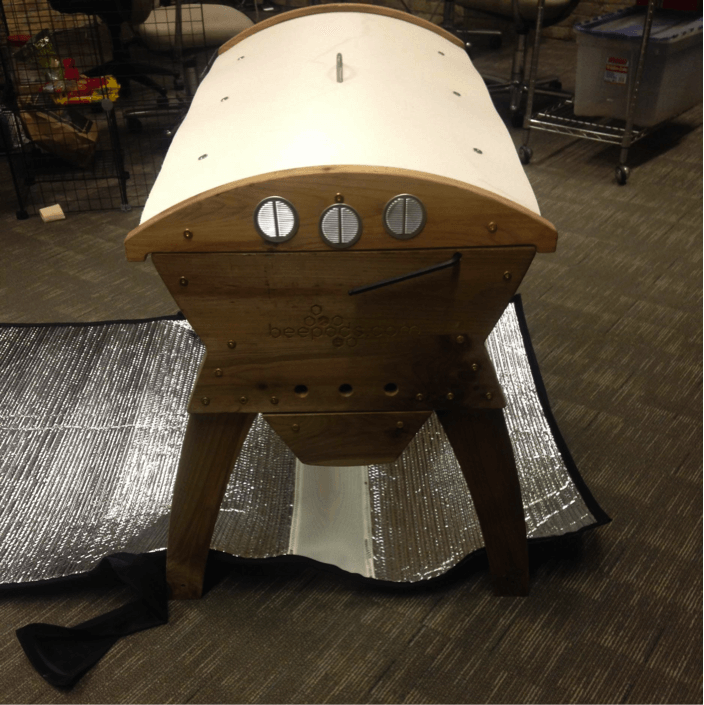
The mesh material will allow for venting, just like the Beepod is designed to do for those awkwardly warm, winter days.
- Squatting next to the Beepod, hold the shorter edge of the Beerito mesh up to match the edge of the Beepod vent.
- Pull the Beerito up and tuck the edges into the spaces you created in between the legs and the body of the Beepod.
- Repeat the process of tucking the Beerito behind the legs on the other side, and let the longer side of the Beerito drape over the top of the Beepod.
- Secure the Velcro by pressing down on the edge with your fist along the entire length of the seam, being sure to secure the corners.

- Attach the black front panels by pulling them across the front of the Beepod and attaching them to the matching Velcro strips on the body of the Beerito wrap.
CONGRATULATIONS!
You have just completed installing your Winterizing Kit!
This Kit is the result of years of trial and error. It represents the most complete protection we’ve devised to help our honeybees survive the challenges of our frigid Northern climate.
A few notes for using the Beerito wrap this year:
#1 Be careful when pulling on the Velcro. ALWAYS ease the velcro up on the corner and hold the bottom down while lifting the top up. Don’t rip it open like a kid on Christmas morning.
#2 We are wishing you (and ourselves) a mouse free winter. The steel wool on the lip is our newest defense and we are VERY interested to hear results.
#3 We at Beepods are wishing your bees the best of luck this coming winter!
Please, remember that no defense is perfect. We have tested each of these mechanisms and have had substantial improvements in success with each iteration over the last few years. If you ever have questions, comments or feedback, call us at (608) 728.8233 or email us at sales@beepods.com.


